Call me crazy (it's probably true) but I am SUPER BIG into formative assessment and not taking grades until they really mean something. So, in my Web Design class where we focus on hardcore coding for the first two months, it's critical that students are challenged and provided feedback daily. My solution? Stickers. Yep. STICKERS.
That's the back of my web design book. It's a book I print up each year (I've considered going digital, but part of the "always on computers in a lab" part of me appreciates making them write in a workbook old school from time to time.)
So, most days, I put up a coding bellringer. It's a simple webpage. They have to start from scratch and try to recreate it in a suitable amount of time (typically 10 minutes, but right now, I'm pushing closer to 15). Sometimes, I hold it until the end of class instead and then the clock really ticks since the bell is going to ring. I'm using Emoji stickers this week, but some weeks it's animal stickers or Star Wars stickers or whatever random stickers I pick. I have a book of holiday stickers that I've used for years.
Here's my rule: I will check your codes and see if you did it and give you a sticker IF AND ONLY IF it's right on the first try. So, you have to check and double check and triple check your codes before you call me over. In a rush? Call me too soon? Forget to close the body? NO STICKER.
It's a bit fun and not super competitive until the smarty pants kids don't get their stickers on the first round and the slow but sure kiddos start to feel like they are the real winners in the bunch. I love it and it gives me an excuse to buy stickers.
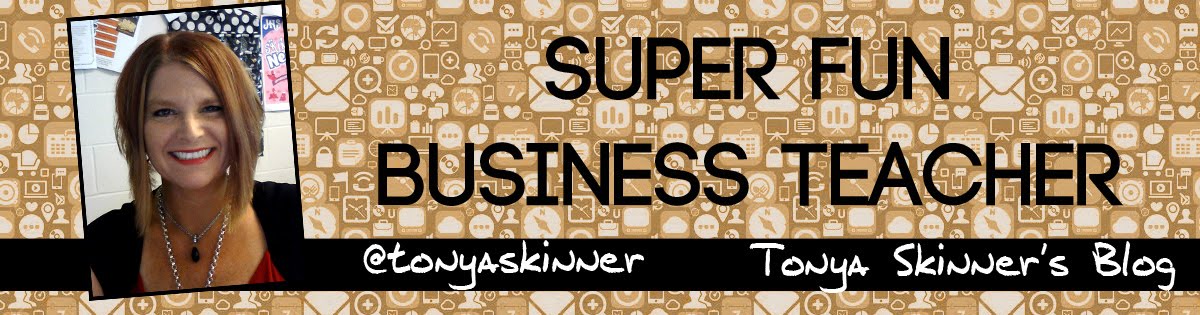
After my students did their bellringer (Mondays we do the agoogleaday.com activity) and I chatted with them for a bit, I put them in groups of 3 or 4 for the Marshmallow Challenge.
If you've never heard of it, there's a TED talk discussing it (which I showed at the end of class) that is about 7 minutes long. As the TED talk led me to believe would happen, most of my students did exactly as he described--they waited until 2 minute warning to put that marshmallow on top! I found it so funny that he said Kindergartners usually tried the marshmallow on top from the beginning.
In my 3rd hour class, we had 9 groups. Only 5 had a structure that could support the marshmallow after 18 minutes. In my 7th hour class, we had 5 groups. Get this--only ONE group had a structure that worked!
And, I used a mini marshmallow (which should be easier) and not a standard size as described in the instructions (since that's all the Dollar Tree had that day). We ended up with many "leaning designs" as you can see in the pictures.
For debriefing, I showed the TED talk and then talked about the importance of testing prototypes along the way and not waiting until the end. I explained that coding is a process. Do what you know is easiest first--structure tags (doctype, html, head, title, body) and immediately save and test to be sure your title is appearing in the tab. Then, move from there, do a bit, and test it. As we all know, you can make such simple errors in coding and it's much easier to test along the way than to spend a half hour typing and then have to dig through that much code to find the errors.
It went over really well and they seemed to work well together and enjoy it. Success! This is definitely happening again next semester with my next batch of Web Design students!
And, hey, as a bonus I'd say we worked on some great 21st century skills of problem solving, critical thinking and collaboration. It was a good day.
This month, I have been reading Learn Like a Pirate and participating in a book study online through Facebook. It's been very interesting getting other viewpoints on the various topics, and the author is participating as well, so it's pretty neat.
In Chapter 6, he talks about Active Learning and how important creating experiences in the classroom can be. He references simulations, debates, fairs, PBL (learning THROUGH projects, not applying AFTER learning), using technology, and reader's theatre.
As I was perusing other blogs and processing what I read, I read this blog and loved her take on NOT sending projects home, but rather using class time to do it. As a classroom teacher AND a mom of two, I cannot agree more!
First, as a parent, I hate science fair projects, display board creations, etc. What happens is that my daughter is too tired so it gets put off to the weekend (usually, Sunday night and Hobby Lobby is closed on Sunday). Then, we have to go spend a bunch of money on something that isn't really "great" in my opinion, so I have to be super hands-on to micro-manage her. Of course, I realize, not all parents get that involved (or even care) but it annoys me for her to work on it in my house and it look terrible. Plus, who wants their kiddo to get a bad grade, right?
Second, as a teacher, if I were to assign projects that had to be completed at home, I would be concerned the student either 1) did not do the work or 2) did not learn through the work. I think I would rather they do it in my presence, ask me questions, get peer feedback and LEARN than go home and have mom do most of the work so it looks good. The learning should be the key, not how much money was sunk into the project.
If you are a big homework or a big "do projects at home" person, please consider this. :) Active learning should be happening IN your classroom, not at home. Be a driving force for engagement at your school. They will have more fun and learn more (you might be tired and it might be chaotic, but it will be worth it!). Have a super rest of the weekend!
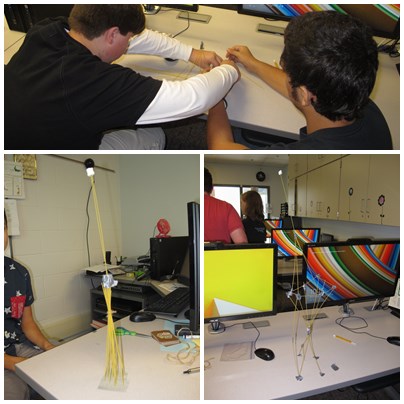
I'm trying really hard to do "new engaging" stuff this year. So, looking at my pirate hooks poster, I decided to try a "Craft Store" hook idea for Web Design. I just introduced the basic HTML structure yesterday. Next, I want to have them create a foldable to help them remember the structure.
I usually draw HTML man and use him to illustrate the concept. Sometimes I put a hat on him, but this time, I just put a question mark above his head.
Notice, since the title tag is inside the head tag, he has title teeth. Clever, eh? Sometimes, he wears title sunglasses. I'll give them the option.
Today, on my prep hour, I was looking for an HTML playground website to use in my class and ran across a cool online tool called LiveWeave. It's got some Dreamweaver-like features but also a collaborative element (I hope to try that out soon!). Check out my short webcast! :)
I'm sure you have heard of the Gallery Walk instructional strategy. This year, instead of talking for an hour or more, I decided to use this as a strategy for covering some of my first few days "things" in my classroom. I generally like to go over my classroom procedures, which are a big thing for me (thanks, Harry Wong!) and have students complete a notes sheet that they keep for reference all semester. Further, I have a class "map" that is on the back where they identify where the various things are in my classroom (handouts, passes, makeup work, where to turn in work, staplers, printers, cameras, extra pencils, etc.).
This year, I decided not to talk, other than informal conversations. I put on music, let them pick partners, and gave them the notes sheet and map sheet. To prepare the room, I printed my PowerPoint that I would typically go over and hung the slides up (in random order) all over the room. I also put more noticeable labels and arrows pointing to the items from the class map (and I'll leave those labels up all year, but not the slides). So, they walked around freely and helped each other locate all the information, scavenger hunt style. Occasionally, I'd yell "freeze" and they had to go find someone they didn't know and introduce themselves. It worked pretty well. They were up and moving, engaged, and no zoning out while I talked and talked.
I think next semester, I might hide some "easter eggs" (as they call them) maybe in the form of QR codes or something with some fun information. It worked pretty well, though, and I didn't end the first week with a sore throat. WIN! :) Hope your first days were (or will be) great!
ADDED 8/17: Here is my PowerPoint, since a few of you asked!
Ah, student growth. We, as teachers, will be evaluated based on this next year in Missouri. But, our school district is having us give a full course pre-test now (this year) so we can track student growth from beginning to end for practice. In some classes, like my Microsoft Office class, I do pre-test by application just to see if there are things everyone always knows. However, my advanced tech classes like Multimedia, Web Design, and Photoshop are a different story. Unless someone just happens to be a dabbler or have a parent who uses one of the programs, most students start with pretty much no requisite knowledge. So, having them do a "final project" now would just be a waste of time.
Thus, I will have to administer objective pre- and post- tests for those courses (the post being the final exam or a test right before the final). I have those, though I also include other parts in my final exams that I will just not include in the pre-test. We have to track data on the "apples to apples" questions and keep a spreadsheet showing student growth from pre- to post- test. FUN! :)
Anyway, I remembered looking at a program (an app, actually) called ZipGrade last summer. ZipGrade turns your phone or tablet into an optical grading machine similar to a Scantron. It reads free-to-download answer sheets. So, I pulled out my phone and logged into the ZipGrade Cloud (had to sign up for that part) and created an answer key to the 50 question exam based on last year's final exam key (easy, just click the bubbles!). Then, I printed an answer sheet and bubbled randomly. **Disclaimer: Yes, I realize they make scantron machines, but the computer ours is hooked to in the lounge doesn't work so you can't get data from it anyway. Oh, and in 18 years, I've never been trained. :) ha ha
I had to go in and create a fictional student to take my test and assign an ID. However, you can import CSV data (which is what I will do when rosters are final and I give the test) with names.
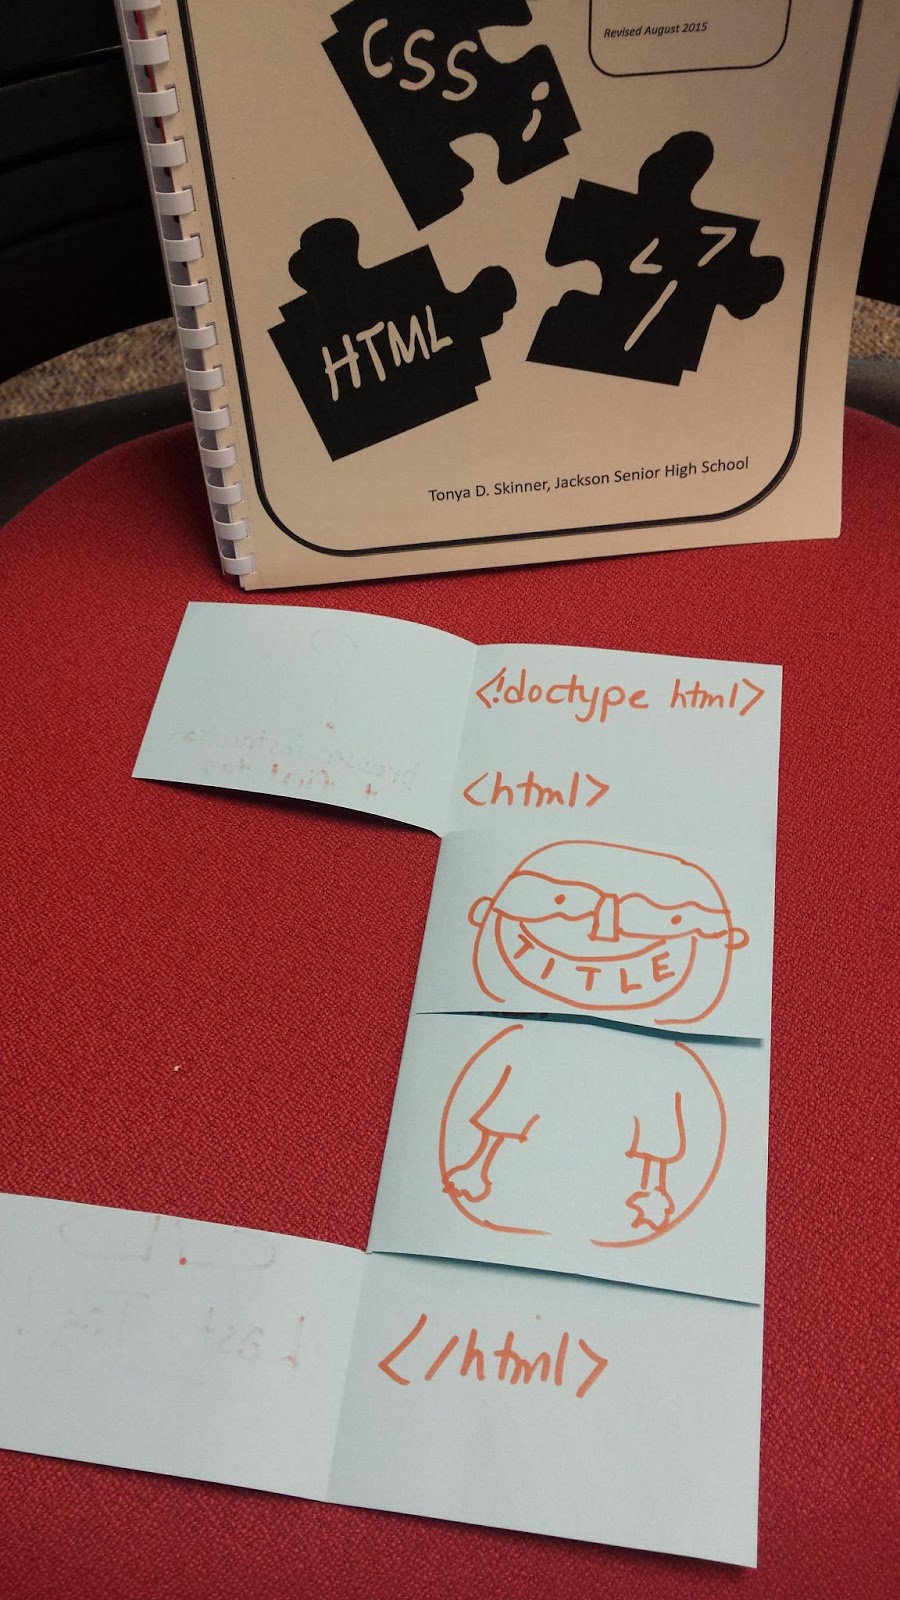
What I like about ZipGrade is that you can easily log into it online and you can see data analysis (how many got each question right and most " alternate answered" of the wrong distractor). Here's a few screenshots. You can see I scanned the same test twice, meaning the student can take it again and you will see it as another attempt.
So, the first 100 scans are free and after that, you'd have to pay. But, it's $6.99/yr. that's not too shabby. :) And, you can print results (as PDF) from the program. One option is "strip report" which is for you to give students and it gives their scores AND their incorrect answers! And, you can also print (if you needed to) a PDF that shows each student on an individual page with their actual scanned test and the answer key.
Here's a short video showing what the app looks like. They have a Google Play app (Android) and an iOS app for the Apple folks.
Oh, and bonus! In trying to show you a video about how to do this, I learned about an app for Android called Mobizen, which I used to record the screen demo. #win #love2learn
We had our first teacher meetings for the new school year today, so I am spending the afternoon in my room trying to revise (or put a little life into) my course syllabi. I saw someone (not sure who...sorry!) had shared a syllabus they create in Piktochart online, a free tool for creating infographics. I figured I'd try it myself! Check it out. What do you think?
I had an account on this for awhile, but hadn't really used it. There are few free templates, so I had to delete several 'blocks' on the template and edit it a bit, but there are many icons built in and it was easy to use. You can't underline and you can't change font or size in the same text box, so it's pretty simplistic, but I like the layout and think it looks pretty cool. You can download the finished design as a PNG or JPG or it gives a direct link and embed code (like I used above).
Direct link-- https://magic.piktochart.com/output/7286124-adv-ca-syllabus-2015
So, completely by accident (that's how I find most things) when I finished my Microsoft Teacher Academy course, I saw a neat little button saying I could "get credit for your completed MVA courses" on Degreed. I was like, um, what's Degreed? And, strangely, I could just not find much information about it online. So, I clicked on it to learn more.
On their website, you'll find this explanation, which is pretty interesting. So, I signed up and got an account. It was quick.
It took a little looking around to figure out how to "connect" my MVA (Microsoft Virtual Academy) account as I had to make my profile public and "share" my courses (under Integrations). But, I eventually figured it out. What's even cooler is that you can connect many other online learning venues! That's really neat. In my Web Design classes, my students work through module on Codecademy and that was on the list! They also had CodeSchool, Kahn Academy, Udemy, and more. So, if you use some online learning in your classes, students could actually connect many of these accounts and this Degreed website will keep the "list" of complete courses in one nice spot. You do have to click "Import" above the Integration when you wish to update it, though.
So, here's my Degreed page. I've done the MVA OneNote online class and a Codecademy online class on making a webpage, so it lists both. Screenshots below or click here.
Anyway, just thought I'd share. I think helping students to keep track (in an official way on a site that will verify that they actually completed modules) of their online learning, especially if it's part of your course or even a "side project" in your class is super cool. We are adding student growth as part of teacher evaluations in Missouri this year and I think showing these completions, which include the month completed, will help document some of that.
What do you think? I absolutely love this as a way to track self-directed learning and hope it will be motivating to my students!
Less than a week ago, Microsoft announced a few online learning options for teachers, which they have termed "Microsoft Teacher Academy." I have been learning Microsoft OneNote using the online course called Teacher Academy--The Ultimate Collaboration Tool: An Introduction to OneNote. It's taken many hours to work through it all, so I've been working about an hour or so each day to try to complete it. It's a bit dry, but he does build in some little assessments along the way and asks questions to make sure you pick up the important points. I recommend frequent breaks. :)
Before you read all this, know this. If your school uses Office 365, then OneNote is awesome and you will find the last few modules of this to be super helpful. I didn't know that before I did all this work.
I've had OneNote on just about every device and computer I've had in the past few years, but I'll be honest that I haven't used it. I am a big Evernote user, and they do seem a bit similar. But, I typically just use Evernote to save things when I am on my phone so I can review them later on my computer.
It starts off a bit slow. I did learn some cool things regarding digital notebooks (which can be saved and shared on OneDrive) and the search features. And, I found it cool that is you paste information from the web that it includes the source URL. That's handy. But, if you are interested, I'd suggest you go to unit 5, Delivering Curriculum with OneNote. That's a pretty neat unit and I learned some ideas for perhaps creating unit plans and such for my classes. I loved embedding audio or having students record audio clips and saving them to the OneNote document and sharing the document with the teacher for assessment purposes.
The neatest thing I learned (Module 6) was about the OneNote Class Notebook (app) feature. I loved how you can set up the student sections automatically and that each student gets their own private space in addition to a collaborative space. There is also a content library for teachers to store "read-only" information as well.
I teach an Advanced Computer Applications (dual credit MS Office) class this year. I thought I might try this until...
wait for it....
Apparently you have to have Office 365 for your school to use the cool class notebook! I tried many different ways to make it work (thinking it would maybe be something in the cloud that I wouldn't have to download and downloading from different places) but I couldn't figure it out. How sad. We are still running Office 2013 Pro at the school. Some of their ideas for staff notebooks was cool, too, and a bit nicer than just sharing resources on the "shared drive" we can only access at school.
I'll still probably use regular OneNote in the class (just not the Class Notebook option) but won't be able to micro-manage their notebooks unless I have them share part of it with me. That sure would have been handy. But, I might do a small pilot in the one section of Adv CA I have in the fall (I have 3 sections in the Spring).
My brain is so full of stuff from this summer! Between the book studies and all the online stuff, I just don't know where to start! Anyone else feeling that way?
Today, I decided to revamp my Web Design PowerPoint a bit. This is mostly what I did last year with minor modification. So, sharing with all of you. Here it is and you can feel free to modify and use if it works for you or just use it for some inspiration.
I start off this class like the others with some basic need to know stuff before this PowerPoint. Then, I begin taking about how helpful taking a coding class, as we are heavy HTML/CSS coding in my class, can be for them.
They take the quiz online (it's 21 multiple choice questions) and then get up and put their name in the box on the wall of the animal that was revealed to them.
Then, they share with their neighbors whether they agree or disagree with the results. They can chat quietly and get to know about each other's personalities a bit this way while others are finishing up.
Sometimes, if there is time, I will have them get into their animal groups. If I was feeling goofy, I might provide masks of each animal... but my school frowns on masks. :)
Common Denominator I made this up a few years ago and I have one big rule (that they don't know)--all of the boxes describe me! My daughter suggested I make all of mine be about summer this year, so that's what they are if you click the link above, but previously, I used this one which was more general:
Oh, grayed out (the final slide) is a "placemat" activity I keep as a "just in case" activity to help them get to know each other. I didn't need it last year, but you can read about it. Sometimes, high school kids like to get out the crayons, too! And, I have them brainstorm terms associated with web design, so it gives me a picture of what they might already know. You could even use it to open day 2.
So, there you have it! That's what we start with in Web Design. If you teach the class and have ideas for any fun activities, please share! And, if you use any of the resources, would you leave me a comment? I prefer to upload these to Teachers Pay Teachers to make it easier to track how many people download, but since these are pretty specific "computer education" stuff, I figured I'd just link them from my OneDrive here.
I'm about to head home for the day, but I spent a good while working on a first day PowerPoint for Photoshop class (and I tend to overplan, so the character quiz might go to day 2).
Many sources say that the first day should be interesting and provide a hook to want them to come back. And, they should learn a little about the class, but not heavy on rules and procedures. So, I begin with a "need to know" PowerPoint (which I am not including here) that takes a few minutes in each class. Then, we dive into deciding if this class is a match for them or not and answering the most common questions.
Thus, this Powerpoint (feel free to download if you teach a graphics class). I start with a fun game of "Photoshop or Nah." They will find a partner during a short game show musical interlude and then each group will be given a paddle with yes on one side and no on the other. I have a few "before" and "after" Photoshop images (well, some aren't Photoshopped) to show them. They will collectively decide whether they think it is or not and then I'll ask for answers all at the same time and reveal the truth.
Next, I go over the reasons you should or should not take my class (good thing I'm an elective, huh?). I hit a few important details (required SD card, grading schema, common questions) as well.
Then, I dive into showing examples of work from previous years and talk about some projects briefly. Projects vary from semester to semester, of course.
Lastly, if there is time, we do a "Cartoon Character" game where they each write down answers to a 10 question quiz and figure out which character they are. Then, they will write their name on a big poster I have under the character they are!
Hey, that's a fun first day, right!? :) Let's hope. Of course, that's just Photoshop. Three more classes to prepare.... but going home!
Well, I got my class numbers today. I have four courses this semester-- Adobe Photoshop, Web Design, Multimedia/Digital Video, and Advanced Computer Applications (dual credit MS Office). Only one class is totally full (which is awesome since I had a computer that wouldn't turn on after sitting all summer!) and some are around 20, which is most ideal for my computer classes.
Anyway, as I was preparing an activity for my Photoshop classes on Photoshop and the media, I realized a common problem: the article had some questionable content. There were some screenshots that included profanity and some ladies in lingerie (and I realize they probably see all of this in magazines and online daily, but I don't want any parents up here angry at me!). So, I needed to get those off of there!
One of my Google Chrome extensions that I use to generate a PDF file (often blogs are blocked at my school by the firewall so I have to PDF articles frequently so students can read offline) is called Print Friendly & PDF. I have only used the extension, but I read that you can create a shortcut button and use it in other browsers as well (so I tried creating the link on the Favorites bar in IE and it worked like a charm).
I created a short video that shows you the steps and just how easy this is to use. So, take a look! (click bottom right corner to enlarge screen)
Hope this helps someone. Back to work!
In case you are interested, here's my Google Hangout recording from EdCamp Global on several Google Chrome extensions.
This Spring, I concocted a "different" peer review technique for use in the classroom. You could adapt this for various needs (writing assignments, artwork, etc.) but as I teach in a computer lab and most of my student work is projects (publishing/graphics projects, videos, podcasts, etc.), my method is mostly "post-it" notes, work displayed on computer monitors, and some music jamming in the background (more about that in a minute). However, I have considered also doing this technique with peer review online, such as through sharing a Google Doc (if a writing assignment) or making a comment on a Google Slides project.
My inspiration was, honestly, I wanted an acronym. And, I thought, what peer review "look fors" do I want? I give scoring guides that are specific and I have given peer review sheets that students fill out, but generally, those peer reviews are done the day the project is due (beginning of hour) with the intention that students then alter their work based on the feedback. What tends to happen, though, is students are afraid they might not finish and it becomes an afterthought and not a way to help them improve before submitting it for grading.
So, as a business teacher, SWOT analysis is something we teach with businesses (Strengths, Weaknesses, Opportunities, Threats) so I pulled the first two letters from that. And, I had to think of a term I could come up with that was easy to remember. Thus, SWIM was born!
I feel like this technique can be done at any point in the project process. The general steps, for me, are as follows:
Assign students a letter (randomly, spell through the room, or by row). So, my Row 1 might be assigned S, Row 2 would be W, and so on.
Have all students get out the work to be checked and put it on top of the desk or on the computer monitor. If there is a scoring guide, the scoring guide should be out as well.
Then, it works like musical chairs. I will play music and students are to find an open computer that isn't immediately to the left or right of their current spot, sit quickly when music stops, and assess using their assigned letter. So, the S people will be looking for "strengths" in the student work (what looks best, what's professional, what's done well). The W kiddos are be identifying "weaknesses" or areas of critical concern (areas that "Mrs. Skinner" might think could be done better, things that do not look professional enough, something that is confusing/unclear). The I folks will come up with "ideas" based on what they see and ideas that might make it even better. Maybe they like what they see but have an idea that might be a cool change that would elevate the overall piece. For a flyer, for example, they might suggest a thicker font because it would be easier to read. Or, maybe there is a little bit of white space on one side and a graphic might look good in that corner. Finally the "M" students will evaluate specifically based on the scoring guide, identifying any items that are missing and are required.
After students identify the assigned "look for", they write down the suggestions--on a Post-it note or a sheet of paper (or online, a comment)--and leave it at the desk (when we do Post-its, we stick it on the monitor). They must include their initials. And, they know that I expect them to be positive or constructive. No mean comments ("this sucks" or "that looks like crap" isn't a suitable piece of feedback...). "Consider a thicker font and check spelling on the title" is better than "the font is ugly and you can't spell."
When the music starts, they get up and quickly move again. We do about 10-12 minutes of peer review time. If you were doing something that involved reading paragraphs or a paper, you might need to allot more time. Or, you could get into a group of 4 and assign each student a letter and they trade back and forth and just work within the group of 4. But, I teach in a lab and it's good for them to get up and move around.
What do you think? Is this something you might try? Let me know @tonyaskinner and best of luck!
I'll admit. Those of you who know me know that I provide lots of resources for FREE. I do workshops that I get paid to do and provide the resources online on a Google Site free of charge, even to non-attendees.
However, I attended a webinar today on "How I Made $5000 Online Selling My Lesson Plans" and thought... hmm. I do like money. She mentioned Teachers Pay Teachers, which I have used for some resources (not really for lesson plans or anything like that; more like classroom management, forms, etc.). And, I have never paid for anything (I like free). She also mentioned Syllabuy, which I had never heard of. Apparently, my business teachers friends haven't either as I searched the "Business" category and only one thing came up. I figured I'd set up my storefronts while the webcast was running...
So, here's my Syllabuy storefront with nothing in it:
Yeah, it's not fancy. And, I don't foresee really putting much on here, but I might make a few free things and test the waters.
And, I have been a member of Teachers Pay Teachers for a long time, but I did set up a storefront there, too (didn't realize I had to do something extra to be a seller):
She taught me quite a bit regarding tips for running a store online, how free members get very little of the purchase price, how some seller sites (TpT) charge a fee if the shopping cart is lower than $3, and how to provide links to "similar resources" like Amazon does to increase sales.
I've been perusing TpT this week for first day ideas and ran across this "back to school board game" that looks cool (it's for 1st-4th grade, but has inspired me to maybe make a "tech" board game for my kids!) so check it out (FREE)--> https://www.teacherspayteachers.com/Product/Back-to-School-Activities-1310541
So, I don't intend to spend a lot of time on this online store stuff. I would like to revise some of my current classroom forms and maybe I'll share them for free. We'll see. :)
Yeah, so I got Google Certified the other day and since decided to see about Microsoft opportunities as I teach a Microsoft Office course at my school.
I ran across the Microsoft Educator Network, joined, and started working through a Teaching with Technology module. The Teaching with Technology (TwT) curriculum is designed to help educators understand how Information and Communication Technology (ICT) can enhance the teaching and learning experience and enable students to acquire 21st century skills. Among many benefits, Teaching with Technology is free, aligned with the UNESCO ICT Competency Framework for Teachers, and self-paced (log back on at any time to pick up where you left off).
I worked through the self-assessment and it identified that I'm pretty savvy. It pushed out only one curriculum module that I needed to complete, which was Selecting ICT Resources for Curriculum. I found that to be funny since I think I'm pretty good at that, but apparently I didn't score high in that area. Nonetheless, the module has been interesting so far. I did Unit 1.
This really went along with much of my summer PD reading. The module was heavy on the importance of starting with clear learning objectives when deciding to integrate technology and to use the tool to enhance teaching and learning rather than starting with the tool and trying to figure out how to use it. I've noticed many teachers struggle with this; they find a cool tool and just want to use it without the use being directed at student learning objectives. Then, after applying a tool in a way that enhances 21st century skills (collaboration, critical thinking, creativity) that support the curriculum, review the decision for mismatches. Make sure students are actually benefitting from the technology tool.
Great advice, of course!
In my pursuit of learning more about PD opportunities with Microsoft, I ran across two more interesting things.
Microsoft Innovative Educator Expert: This is a program that looks interesting (and I love credentials). You have to apply and there are requirements, but I might think about doing it. MIE Experts will be selected by the regional Microsoft representative based on the quality of the responses to the self-nominations form, the level of innovation and use of Microsoft tools described in the learning activity and the level of detail in how becoming a part of the program will impact both teaching and student learning.
Microsoft Teacher Academy Online: They have some online short courses that are supposed to be about 3 hours each. Microsoft has published a set of new online courses called Microsoft Teacher Academies, which are available for free to teachers looking for training and professional development. The online courses are designed to empower educators with the ability to effectively integrate Microsoft's tools in teaching and learning. Courses help bring 21st century technology including Microsoft Office 365, Microsoft OneNote, Skype for Business, and OneDrive into classrooms. I am trying OneDrive out since I haven't used it much. I'm a big Evernote user, and it seems much like it, but so far, the course is showing me how to create digital notebooks for classroom use. I'm intrigued. :)
Man, this has been a fun event! It's not quite over, but I'll have to catch what I can after I run around (back to school shopping and a birthday meal with my hubby since his birthday is today). If you did not participate in the edcamp Global Event (on Twitter? Search for it with #ECG2015) it was such a neat time to network with other educators and hear from those who are truly passionate about teaching.
If they leave it up, you can probably access the Google Hangout or Google Plus sessions by clicking on them (Hangouts on Air are archived automatically to YouTube. So, check it out if you get time and are interested. I love PD that isn't boring, is customized to what I'm interested in (I can pick!), and that I can participate in from home! Here is the schedule: http://edcampglobal.wix.com/edcamp#!schedule/c1204
This was my first "real" time using a Google Hangout. I played around with an unlisted live hangout the night before and after 5 computer crashes, updating video and display drivers, and then coming to grips with having to use Internet Explorer to record the actual Hangout... and a crash 3 minutes before it started... I made it! It was a cool experience. I've done many live events, but they have always been in person or Twitter chats. So, this was new for me.
Some of my favorite sessions so far have been about some new technology tools, interactive student video creation, creating QR codes in Sheets, using Google tools (Drive, Slides, etc.), and just connecting to so many professionals on Twitter. My brain is so full! :)